

Four Kitchens is diving into web-based VR application development. We whipped up a demo VR experience for DrupalCon Baltimore in April of this year, and we have a few more projects we’re putting together. In the spirit of sharing knowledge, I’m going to walk you through the basics of setting up a browser-based WebVR project using A-Frame, React, and aframe-react in this post. Let’s get started!
The Toolchain
Setting up tooling and a build system is probably the hardest part in getting started with WebVR. Thankfully, since building WebVR applications is a lot like building standard web applications, we can re-purpose well documented, industry standard tools. I’ve put together a boilerplate with a simple Node.js application, which contains Webpack build/dev config, linting, Babel config, etc. It’s a great place to get started:
- Clone the boilerplate repository onto your local machine.
- Make sure Node.js, NPM, and Yarn are installed.
- recommend using NVM to install Node.js
- to install Yarn, run: `npm install -g yarn`
- In the root of the boilerplate repository, run `yarn`. This will install all project dependencies.
- In the root of the boilerplate repository, run `yarn start`.
- Yarn will output `Project is running at https://ip:port`. Navigate to that ip/port in your browser, and allow the project to load despite the SSL certs being nonexistent.
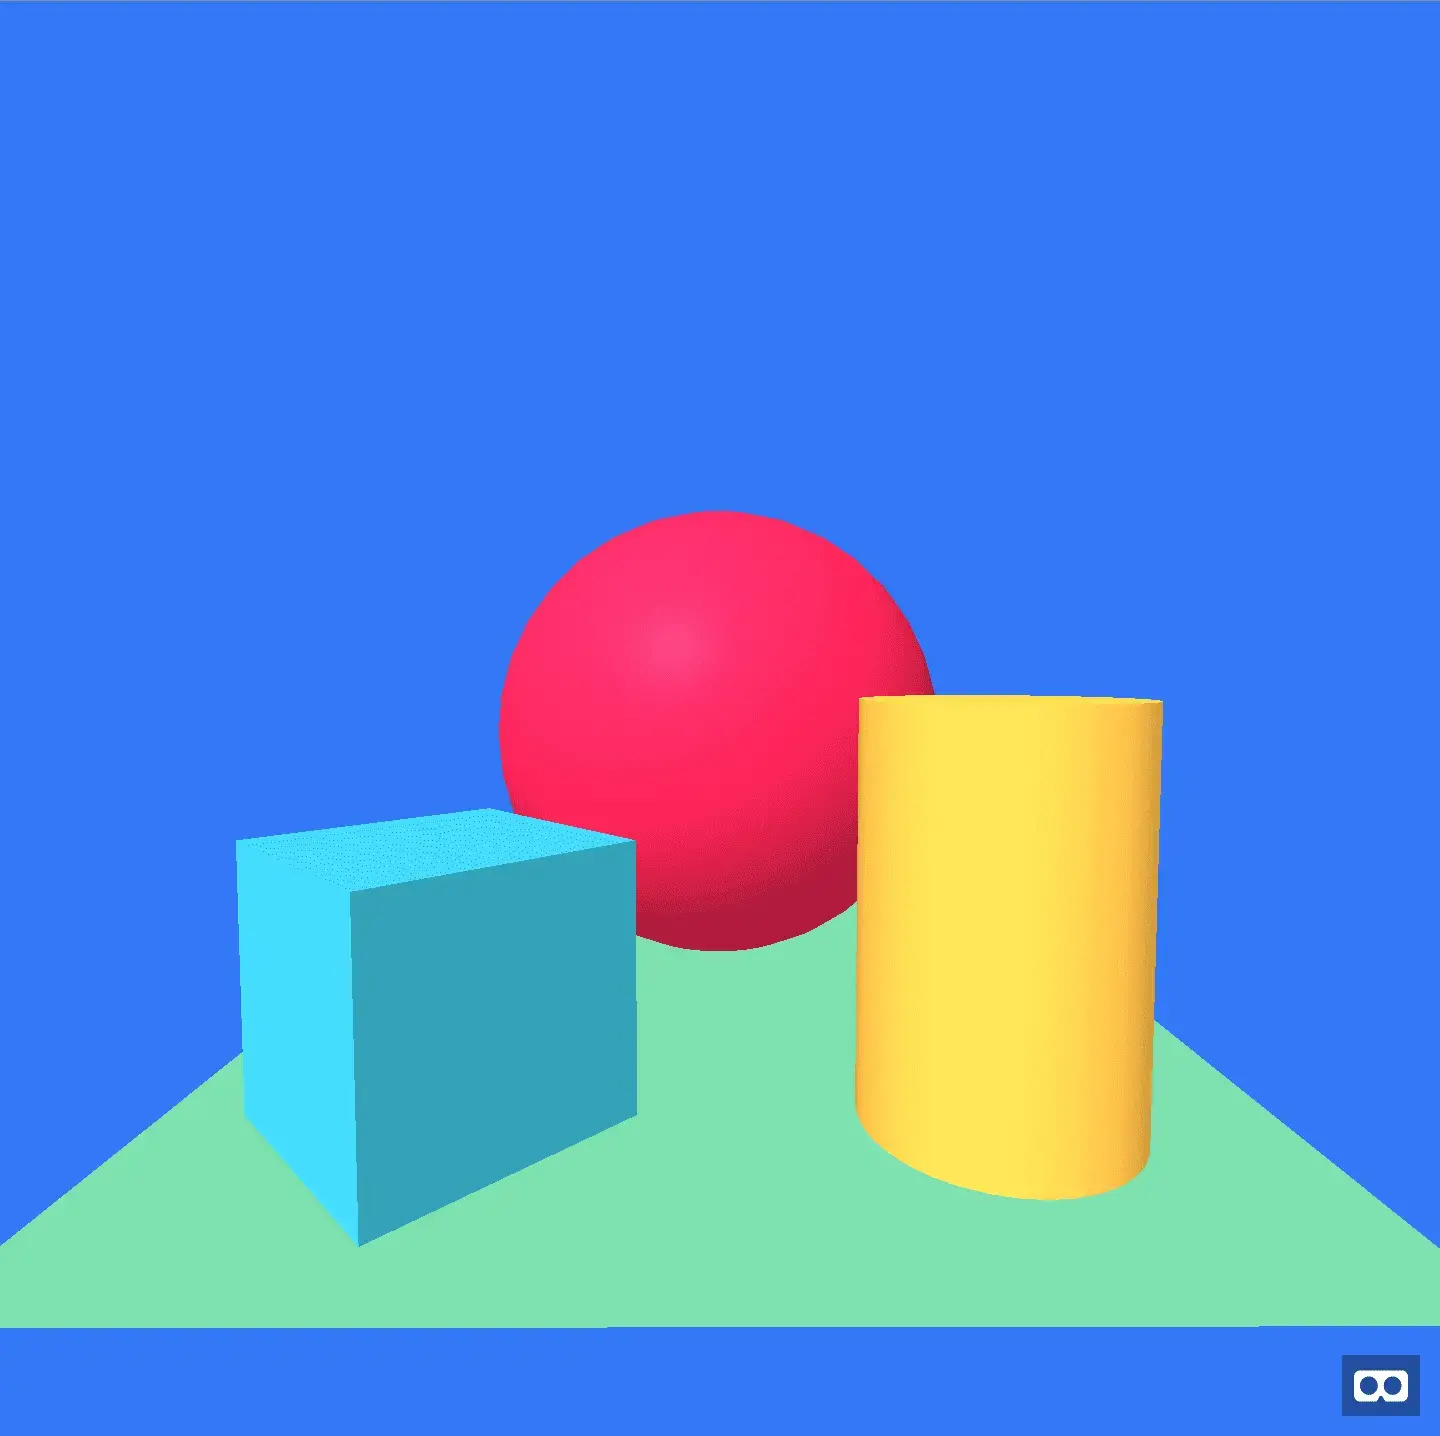
- You should see a simple scene with a sphere, cube, cylinder, and plane.
WebVR Local Development Server?
When you’re writing an standard web application, you typically end up running a local development server, which serves your application on a port on localhost. This works fine for standard applications, but when you’re creating a WebVR application, you need to be able to develop and test everything in a VR headset. If you’re developing using a Google Cardboard or Daydream, this means you’ll need to access your development server on your mobile phone. This can easily be accomplished, and if you’ll take a look at the Webpack Dev server config in our boilerplate, you’ll see that your machine’s local IP is fetched and the development server is set to run on that IP. Once you have the server running, you should be able to load it up on a mobile device connected the same network as your computer.
Make a WebVR Application
In your favourite code editor or IDE, open up src/index.jsx from your cloned boilerplate repo, and let’s get to work! In the boilerplate and in this article, we’re going to be using A-Frame, React, and aframe-react, which allows us to create A-Frame components as React components.
You might ask… why use React? That’s a great question. React is a great tool for building WebVR applications for the same reason it’s a great tool for building standard web applications. React components are declarative, extend-able objects that provide simple tools around state and property management. These things make React very useful, especially in a 3D space. So let’s import a few things and create a basic React component.
In src/index.jsx:
// Import react, react-dom, and a few things from aframe-react. If you look in your package.json file, you’ll see that these have been installed via yarn.
import React from 'react';
import ReactDOM from 'react-dom';
import { Scene, Entity } from 'aframe-react';

// Import the aframe library.
require('aframe');

/**
 * Awesome A-Frame VR app.
 * {@inheritdoc}
 */
const AwesomeVR = () => (
  // Not doing anything in here just yet.
);

// Render our React component on a div with the class “application-container”
ReactDOM.render(<AwesomeVR />, document.querySelector('.application-container'));
In src/index.html:
<html>
  <head>
    <title>Awesome VR</title>
    <meta charset="utf-8" />
    <meta name="viewport" content="width=device-width, initial-scale=1">
    <meta name="apple-mobile-web-app-capable" content="yes" />
    <meta name="apple-mobile-web-app-status-bar-style" content="black" />
  </head>
  <body>
    <main>
      <noscript>This application is not accessible to users with JavaScript turned off.</noscript>
    </main>
     <div class="application-container"></div>
  </body>
</html>
Scenes and Skies
When building a WebVR application, you need to define a “scene”, which is a global object that defines the 3D space in which entities will be placed. Let’s define a scene in our AwesomeVR component:
…
const AwesomeVR = () => (
  <Scene>
    // No A-Frame entities in here yet.
  </Scene>
);
…
The next thing we need to do is add what’s called a “sky”. A sky is a background color or 360° image that will become the background sphere that surrounds users in our VR app. To add a sky, we need to add an entity of the “sky” primitive, and give it either a color, or a 360° equirectangular image:
…
const AwesomeVR = () => (
  <Scene>
    // Add one of the following skies:
    // Background color sky...
    <Entity primitive="a-sky" color="#4286f4" />

    // … or an equirectangular image sky:
    <Entity primitive=”a-sky” src=”https://c1.staticflickr.com/3/2287/2513415428_d14745b420_o.jpg” />
    // This sky image is a photo of The Long Center, in Austin TX.
  </Scene>
);
…
At this point, if you run npm run start or yarn start in the root of this repository, you should be able to load the page served by your dev server, and see a 360° environment with the sky you defined. Cool!
Entities
Now that we have a scene and a sky, let’s create some geometric components, or entities. We’re going to be creating this simple application. I’ll walk you through it in the code comments below:
…
const AwesomeVR = () => (
  <Scene>
    // This is our sky...
    <Entity primitive="a-sky" color="#4286f4" />

    // Let’s make a plane, and put some things on it.
    <Entity
      // You should always specify an “id” property and give your entities a unique name. This will
      // make sure you can inspect your application and identify your components later on.
      id="entity--plane"
      // Tell aframe-react you’re creating a plane.
      // {@link https://aframe.io/docs/0.5.0/primitives/a-plane.html}
      primitive="a-plane"
      // Most entities in A-Frame need to be positioned. Aframe-react allows us to specify a nice,
      // clean object with x, y, and z properties that describe this entity’s position.
      position={{ x: 0, y: 0, z: -4 }}
      // Like position, most entities in A-Frame must have a rotation property as well.
      rotation={{ x: -90, y: 0, z: 0 }}
      // The width and height properties allow us to define the size of the entity.
      width={4}
      height={4}
      // This is self-explanatory, we specify a color. We could alternatively specify a “src” property
      // and set the material of this entity to an image.
      color="#7BC8A4"
    />

// We defined a plane, now let’s put a few things on it!
<Entity
      id="entity--box"
      // This entity is a box, so it’s primitive is “a-box”
      // {@link https://aframe.io/docs/0.5.0/primitives/a-box.html}
      primitive="a-box"
      position={{ x: -1, y: 0.5, z: -3 }}
      rotation={{ x: 0, y: 45, z: 0 }}
      color="#4CC3D9"
    />
    <Entity
      id="entity--sphere"
      // This entity is a sphere, so it’s primitive is “a-sphere”.
      // {@link https://aframe.io/docs/0.5.0/primitives/a-sphere.html}
      primitive="a-sphere"
      position={{ x: 0, y: 1.25, z: -5 }}
      // We set the radius of the sphere here...
      radius={1.25}
      color="#EF2D5E"
    />
    <Entity
      id="entity--cylinder"
      // This entity is a cylinder, so it’s primitive is “a-cylinder”.
      {@link https://aframe.io/docs/0.5.0/primitives/a-cylinder.html}
      primitive="a-cylinder"
      position={{ x: 1, y: 0.75, z: -3 }}
      radius={0.5}
      width={4}
      height={1.5}
      color="#FFC65D"
    />

  </Scene>
);
…
Create your entities, save the file, and then re-visit your app in the browser. You should see something like this:
Testing in Daydream or Cardboard
Yes, you can see your WebVR application on your desktop browser, but seeing your app in a VR headset is very different, and as you’re developing, you’ll need to frequently test your changes in your actual headset. So pull out your mobile phone!
- Connect your phone to the same network that your computer is connected to (WiFi router).
- Open up a WebVR-compatible browser (Google Chrome or Safari).
- Type in the IP address and port number that points to your dev server running on your computer, and then load up the application.
- Click the VR mode toggle button in the lower right hand corner of the app.
- Slide your phone into your Cardboard or Daydream.
- If you’re using a Daydream, initialize your controller, after the initialization has been completed you’ll be taken to your app.
And violà! You’ve made a very simple WebVR application with A-Frame, React, and aframe-react. From here, you’ll want to take a look at the A-Frame documentation and read about all the different primitives and components at your fingertips.
This is the first of many posts about WebVR. In our next installation, we’ll be covering ReactVR, another WebVR framework. Until then, have fun playing with A-Frame!
Making the web a better place to teach, learn, and advocate starts here...
When you subscribe to our newsletter!